Let me tell you, meal prep burritos are a total game changer for busy days! They’re not just about convenience; they’re a delicious and healthy way to ensure you have nutritious lunches ready to go. I can’t tell you how many times these burritos have saved me when I’ve had back-to-back meetings or a day filled with errands. Just grab one from the fridge, and I’m set!
What I love most about these meal prep burritos is their versatility. You can jazz them up with your favorite veggies or even switch up the spices to fit your mood. Plus, with wholesome ingredients like brown rice, black beans, and fresh veggies, you can feel good about what you’re eating. Seriously, you’ll wonder how you ever lived without them!
Whether you’re meal prepping for the week or just need a quick grab-and-go option, these burritos are the perfect solution. So, roll up your sleeves, and let’s dive into making some of the best meal prep burritos you’ll ever have!
Why You’ll Love This Recipe
These meal prep burritos are not just a tasty meal; they’re a lifesaver for anyone with a busy schedule. Here’s why you’re going to love them:
- Quick Preparation: With just 15 minutes of prep time, you can whip up a week’s worth of lunches in no time!
- Healthy Ingredients: Packed with wholesome ingredients like brown rice, black beans, and fresh veggies, these burritos are as nutritious as they are delicious.
- Customizable Options: Feel free to swap in your favorite veggies or proteins. Want to add some spicy jalapeños or a sprinkle of cheese? Go for it!
- Perfect for Meal Prep: These burritos store beautifully in the fridge or freezer, making them an ideal option for meal prepping. Just grab and go!
- Delicious and Filling: Each burrito is packed with flavor and will keep you satisfied throughout your busy day.
Ingredients List
Gathering the right ingredients is key to making these delicious meal prep burritos. Here’s what you’ll need:
- 1 cup brown rice: This will be the hearty base of your burritos. Make sure to rinse it under cold water before cooking to remove excess starch for fluffier rice.
- 1 can black beans (15 oz), rinsed: A protein-packed superstar! Rinsing the beans helps reduce sodium and keeps the filling from being too watery.
- 1 cup corn: Fresh, frozen, or canned – whichever you prefer! If using canned corn, give it a quick rinse too.
- 1 red bell pepper, diced: Adds a sweet crunch and vibrant color. Just chop it up into bite-sized pieces.
- 1 avocado, sliced: For that creamy goodness! Slice it just before assembling the burritos to keep it fresh and green.
- 1 teaspoon cumin: This spice adds a warm, earthy flavor. Trust me, it’s a must for that authentic taste!
- 1 teaspoon chili powder: Gives a little kick! Adjust the amount based on your spice preference.
- 4 large whole wheat tortillas: Choose the largest ones you can find for easy rolling. Whole wheat tortillas add a nice nutty flavor and extra fiber.
- Salt and pepper to taste: Don’t forget to season your filling! A pinch of salt and a dash of pepper can elevate the flavors.
Feel free to get creative with these ingredients! You can add in extras like diced onions, chopped cilantro, or even some shredded cheese if you like. The sky’s the limit!
How to Prepare Meal Prep Burritos
Making these meal prep burritos is a breeze, and the best part is you can do it all in under an hour! Here’s a step-by-step guide to ensure you end up with burritos that are not only tasty but also perfectly stuffed and ready for your week.
Cooking the Rice
First things first, let’s get that brown rice cooking! Rinse 1 cup of brown rice under cold water until the water runs clear. This helps to remove excess starch and makes your rice fluffier. Then, cook it according to the package instructions. Usually, you’ll need to combine it with 2 cups of water, bring it to a boil, and then simmer it for about 30-40 minutes, or until the water is absorbed and the rice is tender. Keep an eye on it, and fluff it with a fork once it’s done to keep those grains separate!
Preparing the Filling
While your rice is cooking, it’s time to whip up the filling! In a large mixing bowl, combine the rinsed black beans, corn, diced red bell pepper, cumin, chili powder, and a sprinkle of salt and pepper. Mix everything together until well combined. You want those flavors to meld beautifully! Once your rice is cooked and cooled a bit, add it to the bowl and stir until all the ingredients are mixed well. This filling is where the magic happens, so make sure to taste it and adjust the seasoning to your liking!
Assembling the Burritos
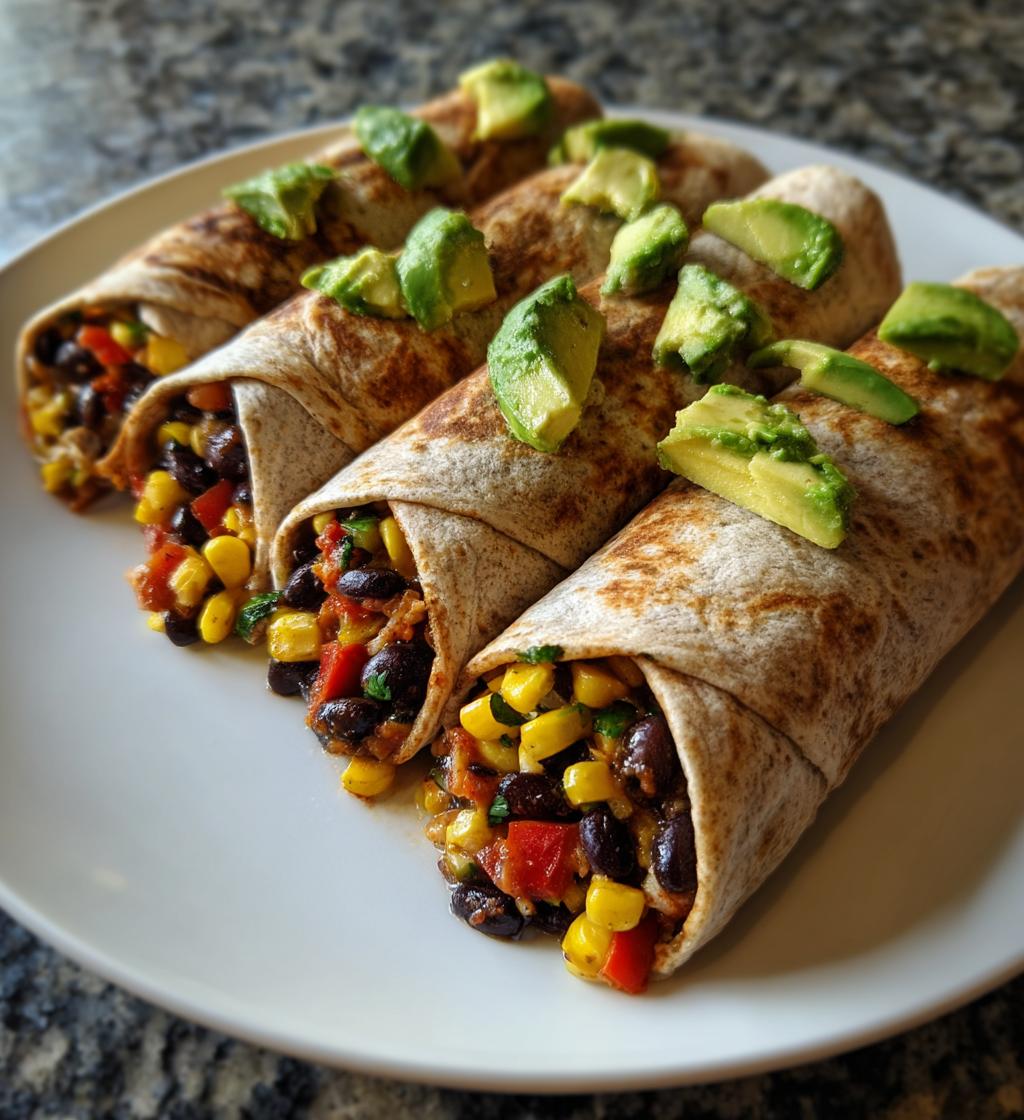
Now, let’s roll those burritos! Lay out your large whole wheat tortillas on a clean surface. Start by dividing the filling evenly among the tortillas, placing it slightly off-center. Don’t overfill, or you’ll have a hard time rolling them! Add a couple of avocado slices on top of the filling for that creamy goodness. To roll, fold the sides of the tortilla over the filling, then start from the bottom and roll it tightly until you reach the top. Make sure to tuck in the sides as you go to keep everything secure. It might take a couple of tries to get it just right, but practice makes perfect!
Storing and Reheating
Once your burritos are rolled, wrap each one tightly in foil or plastic wrap to keep them fresh. You can store them in the refrigerator for up to 5 days, or freeze them for up to 3 months if you want to prep ahead! When you’re ready to eat, simply reheat them in the microwave for about 1-2 minutes or pop them in the oven at 350°F (175°C) for about 15-20 minutes. Enjoy your delicious, homemade meal prep burritos that are packed with flavor and nutrients!
Tips for Success
To make sure your meal prep burritos turn out perfect every time, here are some handy tips and tricks I’ve picked up along the way:
- Don’t Skip the Rinse: Rinsing your black beans and corn is key! It helps reduce the sodium and keeps your filling from getting too soggy. You want a nice, hearty texture!
- Experiment with Spices: Feel free to spice things up! If you’re a fan of heat, throw in some cayenne pepper or diced jalapeños. You can even try adding a bit of smoked paprika for a deeper flavor.
- Vegetable Variations: Got extra veggies lying around? Toss in some diced zucchini, spinach, or even some roasted sweet potatoes. The more colors, the better – plus, it keeps things interesting!
- Make It a Protein Powerhouse: Want to add more protein? Consider mixing in some shredded chicken or turkey, or even some quinoa for a plant-based boost! You can also swap the black beans for pinto or kidney beans if that’s what you have on hand.
- Wrap It Up Right: When rolling the burritos, make sure to tuck in the sides tightly to prevent any filling from spilling out. Practice makes perfect, so don’t worry if your first few rolls aren’t picture-perfect!
- Label Your Freezer Packs: If you’re freezing your burritos, label them with the date and contents. That way, you’ll know exactly what you’ve got when you’re ready to dig in!
With these tips, you’re well on your way to creating meal prep burritos that are not just convenient but also bursting with flavor. Happy cooking!
Nutritional Information
When it comes to meal prep burritos, knowing what you’re eating is super important! Here’s the estimated nutritional data for one burrito:
- Calories: 400
- Fat: 10g
- Protein: 15g
- Carbohydrates: 65g
- Sugar: 2g
- Sodium: 300mg
- Fiber: 12g
- Cholesterol: 0mg
Keep in mind that these values are estimates and can vary based on the specific brands and quantities of ingredients you use. But overall, these burritos are a nutritious and filling option that fits perfectly into a balanced diet. Enjoy every delicious bite knowing you’re fueling your body right!
FAQ Section
Got questions about these meal prep burritos? No worries, I’ve got you covered! Here are some common queries that might pop up while you’re whipping these up:
Q1: Can I make these burritos ahead of time?
Absolutely! These meal prep burritos are perfect for making ahead. You can prepare them on the weekend and store them in the fridge for up to 5 days or freeze them for up to 3 months. Just remember to wrap them tightly to keep them fresh!
Q2: What if I don’t like black beans?
No problem at all! You can easily swap black beans with pinto beans, kidney beans, or even lentils. The beauty of these burritos lies in their versatility, so feel free to use any protein source you enjoy!
Q3: How do I reheat the burritos without making them soggy?
To reheat, I recommend using the oven for the best results. Preheat it to 350°F (175°C) and bake the burritos for about 15-20 minutes. If you’re in a hurry, the microwave works too—just keep it to 1-2 minutes and enjoy!
Q4: Can I add cheese to the burritos?
Definitely! Adding cheese is a fantastic way to enhance the flavor. Just sprinkle some shredded cheese on top of the filling before you roll them up. If you like it melty, you can reheat the burrito in the oven until the cheese is gooey and delicious!
Q5: Are these burritos suitable for meal prepping on a budget?
Yes, these meal prep burritos are very budget-friendly! The ingredients like brown rice, black beans, and corn are typically inexpensive and can stretch a long way. Plus, you can customize them with whatever veggies you have on hand, making them even more economical!
Serving Suggestions
Now that you’ve got your meal prep burritos ready to go, let’s talk about some delicious serving suggestions that will take your lunch to the next level! These burritos are great on their own, but pairing them with the right sides or dips can really elevate your meal.
- Green Salad: A fresh, crunchy salad is the perfect side! Try a simple mixed greens salad with cherry tomatoes, cucumber, and a light vinaigrette. The crispness of the veggies complements the hearty burritos beautifully.
- Guacamole or Salsa: You can’t go wrong with a side of guacamole or your favorite salsa. The creamy avocado or zesty salsa adds a burst of flavor that pairs wonderfully with the spices in the burritos.
- Greek Yogurt: For a tangy twist, serve your burritos with a dollop of Greek yogurt instead of sour cream. It adds creaminess and a protein boost while keeping things fresh and light.
- Grilled Corn: If you want to stick with the Mexican theme, grilled corn on the cob is an amazing side dish! Just brush it with a little lime juice and sprinkle some chili powder for an extra kick.
- Rice and Beans: Make it a full meal by serving your burritos alongside a side of seasoned rice and beans. It’s comforting and filling, giving you that classic combo everyone loves.
These meal prep burritos are versatile enough to go with just about anything. Mix and match these sides, and you’ll never get bored of your lunches! Trust me, once you try these combinations, you’ll be looking forward to lunchtime every day!
Storage & Reheating Instructions
Storing your meal prep burritos properly is crucial to keeping them fresh and delicious! Here’s how to make sure you get the most out of your tasty creations:
Once you’ve rolled up your burritos, wrap each one tightly in foil or plastic wrap. This step is super important to prevent them from drying out in the fridge or freezer. If you’re planning to eat them within the week, they’ll last in the refrigerator for up to 5 days. Just make sure your fridge is at the right temperature to keep everything safe!
If you want to keep your burritos for longer, they freeze beautifully! Wrap each burrito securely in foil, and then place them inside a freezer-safe bag or container. Make sure to label them with the date so you know when they were made. These burritos can be frozen for up to 3 months. Just remember, the longer they’re in there, the more their flavor may fade!
When you’re ready to enjoy your meal prep burritos, reheating is a breeze. For the best results, I recommend using the oven. Preheat it to 350°F (175°C) and place the burrito on a baking sheet. Heat for about 15-20 minutes, or until it’s warmed through and the tortilla is slightly crispy. This method keeps them nice and tasty!
If you’re in a hurry, you can also reheat them in the microwave. Just place the burrito on a microwave-safe plate and cover it with a damp paper towel to help retain moisture. Heat it for about 1-2 minutes, turning it halfway through to ensure even warming. Just be careful not to overdo it, or you might end up with a chewy burrito!
With these storage and reheating tips, you can enjoy your meal prep burritos at their best, making lunchtime a breeze! Enjoy every delicious bite!
Print
Meal Prep Burritos: 5 Easy Steps to Delicious Convenience
- Total Time: 45 minutes
- Yield: 4 burritos 1x
- Diet: Vegetarian
Description
Healthy and convenient meal prep burritos for easy lunches.
Ingredients
- 1 cup brown rice
- 1 can black beans, rinsed
- 1 cup corn
- 1 red bell pepper, diced
- 1 avocado, sliced
- 1 teaspoon cumin
- 1 teaspoon chili powder
- 4 large whole wheat tortillas
- Salt and pepper to taste
Instructions
- Cook the brown rice according to package instructions.
- In a large bowl, combine black beans, corn, red bell pepper, cumin, chili powder, salt, and pepper.
- Add the cooked rice to the bowl and mix well.
- Lay out the tortillas and divide the filling evenly among them.
- Add avocado slices on top of the filling.
- Roll up the burritos tightly, tucking in the sides.
- Wrap each burrito in foil or plastic wrap.
- Store in the refrigerator for up to 5 days.
Notes
- Feel free to customize with your favorite vegetables.
- These burritos can be frozen for up to 3 months.
- Reheat in the microwave or oven when ready to eat.
- Prep Time: 15 minutes
- Cook Time: 30 minutes
- Category: Lunch
- Method: Baking
- Cuisine: Mexican
Nutrition
- Serving Size: 1 burrito
- Calories: 400
- Sugar: 2g
- Sodium: 300mg
- Fat: 10g
- Saturated Fat: 1g
- Unsaturated Fat: 8g
- Trans Fat: 0g
- Carbohydrates: 65g
- Fiber: 12g
- Protein: 15g
- Cholesterol: 0mg
Keywords: meal prep burritos, healthy burritos, vegetarian burritos