Oh my goodness, if you haven’t tried making air fryer bread yet, you are in for a delightful surprise! This simple air fryer bread recipe is not just quick—I’m talking about a total prep and cook time of just 30 minutes—but it’s also so easy that even beginners can whip it up without breaking a sweat. Trust me, once you see how effortlessly this bread comes together, you’ll never look back.
The beauty of this recipe is in its simplicity. With just a handful of ingredients—flour, baking powder, salt, and water—you can create a warm, comforting loaf that fills your kitchen with the most inviting aroma. It’s perfect for those moments when you want freshly baked bread without the fuss of traditional methods. Plus, the air fryer gives it that perfect golden crust, making it a treat for the eyes and the taste buds!
So, gather your ingredients and get ready to experience the joy of homemade air fryer bread. Let’s dive in!
Ingredients List
To make this scrumptious air fryer bread, you’ll need just a few basic ingredients that you probably already have in your pantry. Here’s what you’ll need:
- 2 cups all-purpose flour: This is the heart of your bread, giving it structure and that delightful chewy texture.
- 1 tablespoon baking powder: This is your leavening agent, helping the bread rise and become beautifully fluffy.
- 1 teaspoon salt: A must for flavor! It enhances the taste of the bread and balances the sweetness.
- 1 cup water: This brings everything together, creating a dough that’s easy to work with.
That’s it! Simple, right? These everyday ingredients transform into a warm loaf of homemade goodness in no time. Now, let’s get started on how to prepare it!
How to Prepare Air Fryer Bread
Now that you’ve gathered your ingredients, let’s get into the fun part—preparing the bread! Follow these simple steps, and you’ll be amazed at how easy it is to create your own air fryer bread.
Mixing the Dough
First things first, grab a large mixing bowl. You’ll want to start by combining the 2 cups of all-purpose flour, 1 tablespoon of baking powder, and 1 teaspoon of salt. Give it a good mix with a whisk or fork to ensure everything is evenly distributed. Trust me, taking this extra step makes a difference!
Next, slowly pour in 1 cup of water while mixing with your other hand. It’s like a little dance! Keep stirring until the mixture begins to form a dough. It should be a bit sticky but not too wet—if it feels too sticky, sprinkle in a touch more flour. Once it looks like a cohesive dough, you’re ready for the next step.
Shaping the Dough
Now, it’s shaping time! Lightly flour your hands and gently turn the dough out onto a clean surface. With your hands, shape it into a ball. Don’t worry about making it perfect—this is homemade bread, after all! Just ensure it holds together nicely and has a smooth surface. You want it to fit comfortably in your air fryer basket.
Preheating the Air Fryer
Before you pop that dough in, preheat your air fryer to 350°F (175°C). This step is super important because it helps achieve that lovely golden crust. Let it preheat for about 5 minutes while you’re shaping the dough. It’ll be worth the wait!
Cooking the Bread
Once your air fryer is preheated, carefully place the dough ball in the basket. Set the timer for 15-20 minutes and let the magic happen! You might want to peek in at around the 15-minute mark. The bread is done when it’s golden brown on the outside and sounds hollow when you tap it gently on the bottom. If it needs a bit more time, don’t hesitate to let it go for another minute or two.
Cooling and Slicing
After it’s cooked to perfection, carefully remove the bread from the air fryer. Let it cool on a wire rack or a cutting board for at least 10 minutes before slicing. I know it’s tempting to dive right in, but letting it cool helps lock in that soft texture and makes slicing much easier. Trust me, it’ll be worth the wait!
Tips for Success
Now that you’re all set to whip up your air fryer bread, I want to share some of my favorite tips to ensure it turns out perfectly every time. Trust me, these little nuggets of wisdom can make a world of difference!
Watch Your Dough Consistency
Getting the right dough consistency is key! If your dough ends up too wet, it might not hold its shape in the air fryer. Start with the recommended water amount, but if it feels overly sticky, add a little more flour until it’s manageable. Conversely, if it’s too dry, add a splash more water. Finding that sweet spot will lead to a beautifully textured bread!
Preheat for Perfection
Don’t skip the preheating step! Preheating your air fryer is essential for achieving that crispy crust. I usually set my air fryer to preheat while I’m shaping the dough. This way, when it’s time to cook, everything’s ready to go. A hot start makes all the difference!
Keep an Eye on Cooking Time
Every air fryer is a little different, so keep an eye on your bread as it cooks. Check it around the 15-minute mark and tap the bottom gently—if it sounds hollow, you’re golden! If it needs a few extra minutes, don’t worry; just monitor it closely to avoid overcooking.
Let It Cool
I know it’s hard to resist the warm, inviting aroma, but letting your bread cool is crucial! Cooling it on a wire rack for at least 10 minutes helps maintain that perfect texture. Slicing it too soon can lead to a gummy interior, which no one wants. Patience is key here!
Experiment and Have Fun!
Lastly, don’t be afraid to get creative! This air fryer bread is a fantastic base for adding your favorite herbs, spices, or even cheese. A little rosemary or garlic powder can elevate this bread to new heights. Just remember to keep the ratios balanced so the dough still holds together. Enjoy the process and make it your own!
Variations of Air Fryer Bread
Now that you’ve mastered the basic air fryer bread recipe, let’s take it up a notch! This bread is a fantastic canvas for all sorts of delicious flavors. Here are some fun ideas to customize your loaf and make it uniquely yours!
Herb-Infused Bread
If you love a savory touch, try adding fresh or dried herbs to the dough. Rosemary, thyme, or oregano are great choices that bring a wonderful aroma and flavor. Just mix in about 1-2 tablespoons of your chosen herbs when you combine the dry ingredients. It’s like a little garden in your bread!
Garlic and Cheese Delight
For garlic lovers, how about a garlic and cheese version? You can add minced garlic or garlic powder to the dough, about 1-2 teaspoons should do it. And don’t forget cheese! Shredded cheddar or parmesan mixed into the dough adds a delightful richness. Just keep in mind, if you’re adding cheese, you may want to reduce the amount of water slightly to maintain the right dough consistency.
Sweet Twist with Honey or Cinnamon
If you’re in the mood for something sweet, a touch of honey or cinnamon can work wonders. Add about 2 tablespoons of honey to the dough for a subtly sweet flavor. For a cinnamon twist, sprinkle in 1-2 teaspoons of ground cinnamon when mixing the dry ingredients. You can even mix in raisins or chopped nuts for extra texture and sweetness!
Spicy Kick
Want to spice things up? Add a pinch of red pepper flakes or cayenne pepper to the dough for a kick of heat! Just a little can transform your bread into a savory treat that pairs wonderfully with soups or stews.
Experiment with Flours
Feeling adventurous? Try swapping out some of the all-purpose flour for other types! Whole wheat flour adds a nutty flavor and heartiness, while spelt flour gives a lovely texture. Just keep in mind that you may need to adjust the water content slightly, so add it gradually until you get the right dough consistency.
These variations not only enhance the flavor but also let you express your creativity in the kitchen! So, feel free to mix and match these ideas, and don’t be shy about trying something new. The beauty of this air fryer bread is that it’s all about making it your own. Enjoy the process and happy baking!
Storage & Reheating Instructions
Once you’ve enjoyed your delicious air fryer bread, you might be wondering how to keep those leftovers fresh for later. Don’t worry, I’ve got you covered! Proper storage is key to maintaining that soft texture and delightful flavor.
To store your leftover bread, let it cool completely first—this prevents moisture from building up inside the container. Then, wrap the loaf tightly in plastic wrap or place it in an airtight container. This will keep it fresh and prevent it from drying out. If you have extra slices, you can also place them in a zip-top bag, squeezing out as much air as possible before sealing.
If you think you won’t eat it within a few days, consider freezing it! Slice the bread first so you can grab just what you need later. Wrap each slice in plastic wrap, then place them in a freezer-safe bag or container. When you’re ready to enjoy, just pull out a slice or two and let them thaw at room temperature.
Now, let’s talk reheating! If you want to warm up your bread, the best method is either in the air fryer or the oven. For the air fryer, preheat it to 300°F (150°C) and place your bread in for about 3-5 minutes. You’ll love how it brings back that warm, freshly-baked texture!
Alternatively, you can use the oven. Wrap the bread in aluminum foil to keep it from getting too crusty, and heat it in a preheated oven at 350°F (175°C) for about 10 minutes.
With these storage and reheating tips, you can enjoy your air fryer bread long after it’s made! Happy snacking!
Nutritional Information Section
When you whip up this delightful air fryer bread, it’s always nice to know what you’re enjoying! Here’s a breakdown of the typical nutritional values per serving (which is one slice). Keep in mind that these numbers are estimates and can vary based on the specific brands of ingredients you use.
- Calories: 120
- Fat: 1g
- Saturated Fat: 0g
- Unsaturated Fat: 1g
- Trans Fat: 0g
- Sodium: 200mg
- Carbohydrates: 24g
- Fiber: 1g
- Protein: 3g
- Cholesterol: 0mg
- Sugar: 0g
This air fryer bread is a great option if you’re looking for a simple, homemade delight that won’t break the calorie bank. Enjoy it as part of a balanced meal or as a tasty snack, and embrace the joy of baking right at home!
FAQ Section
As you dive into the world of air fryer bread, you might have a few questions. Don’t worry! I’ve got you covered with answers to some of the most common queries I hear from fellow bakers.
Can I use whole wheat flour instead of all-purpose flour?
Absolutely! Whole wheat flour can be a great alternative. It adds a nutty flavor and makes the bread a bit heartier. Just keep in mind that you may need to adjust the water amount slightly since whole wheat flour absorbs more moisture. Start with the original amount and add a little more if needed to achieve the right dough consistency.
What if my dough is too sticky?
If your dough feels too sticky to handle, don’t panic! Just sprinkle in a bit more all-purpose flour, a tablespoon at a time, until it’s manageable. It’s all about finding that sweet spot where the dough holds together without being overly wet. Remember, a little extra flour can go a long way!
How do I know when my air fryer bread is done cooking?
Great question! You’ll know your bread is done when it’s nicely golden brown on the outside and sounds hollow when you tap it gently on the bottom. Checking around the 15-minute mark is a good idea, but if it needs more time, just give it a minute or two more. Every air fryer is a bit different, so keep an eye on it!
Can I add ingredients like cheese or herbs to this recipe?
Definitely! This air fryer bread is super versatile. Feel free to mix in shredded cheese, herbs, or even spices to customize the flavor. Just make sure to keep the ratios balanced so the dough still holds together well. It’s a fun way to make the recipe your own!
How should I store leftover air fryer bread?
To keep your leftover air fryer bread fresh, let it cool completely first. Then, wrap it tightly in plastic wrap or store it in an airtight container. If you think you won’t eat it within a few days, consider slicing it and freezing individual pieces. This way, you can enjoy warm slices any time you crave a tasty treat!
Print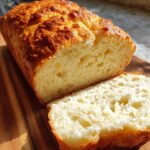
Air Fryer Bread: 30 Minutes to Fresh, Heavenly Delight
- Total Time: 30 minutes
- Yield: 1 loaf 1x
- Diet: Vegetarian
Description
Simple air fryer bread recipe for quick and easy homemade bread.
Ingredients
- 2 cups all-purpose flour
- 1 tablespoon baking powder
- 1 teaspoon salt
- 1 cup water
Instructions
- In a bowl, mix flour, baking powder, and salt.
- Add water gradually and mix until a dough forms.
- Shape the dough into a ball.
- Preheat the air fryer to 350°F (175°C).
- Place the dough in the air fryer basket.
- Cook for 15-20 minutes until golden brown.
- Let it cool before slicing.
Notes
- Store leftover bread in an airtight container.
- This recipe can be doubled.
- Experiment with herbs for added flavor.
- Prep Time: 10 minutes
- Cook Time: 20 minutes
- Category: Bread
- Method: Air Frying
- Cuisine: American
Nutrition
- Serving Size: 1 slice
- Calories: 120
- Sugar: 0g
- Sodium: 200mg
- Fat: 1g
- Saturated Fat: 0g
- Unsaturated Fat: 1g
- Trans Fat: 0g
- Carbohydrates: 24g
- Fiber: 1g
- Protein: 3g
- Cholesterol: 0mg
Keywords: air fryer bread, homemade bread, quick bread